Disclosure: This post may contain affiliate links. If you click on a link and make a purchase, I may earn a small commission — at no extra cost to you. I only recommend tools and resources I genuinely find useful.
Murf AI is one of the most full-featured platforms for AI voice generation, but to get the most out of it, it helps to see the entire process step by step — from creating a new project to exporting the finished audio file. This guide shows exactly that, with real screenshots from the Murf AI workspace.
Step 1: Sign Up and Start a New Project
Once you create your free account on the platform, your main dashboard will load. This is where the entire voice generation process begins.
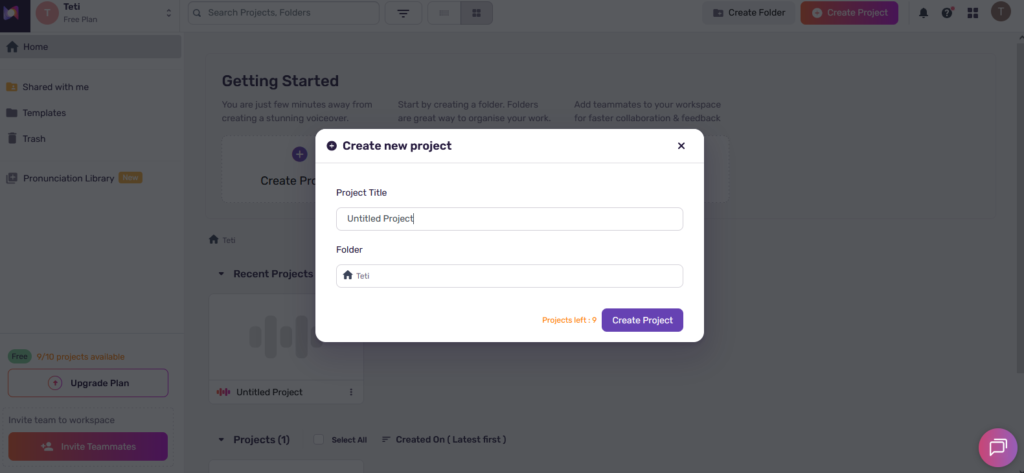
- New Project Button: In the upper right corner of the screen, or in the center, click the reddish/purple “Create Project” button.
- “Create new project” pop-up: A small form will appear on screen, where you need to set the basic parameters of your audio file:
- Project Title: Click the text field that says “Untitled Project” and enter a recognizable name for your file (for example: “Voiceover – Khan Asparuh”).
- Folder: By default, the project will be saved in your personal main folder.
- Finalize: Click the purple “Create Project” button at the bottom right of the pop-up window.
Step 2: Getting to Know the Audio Studio and Choosing a Voice
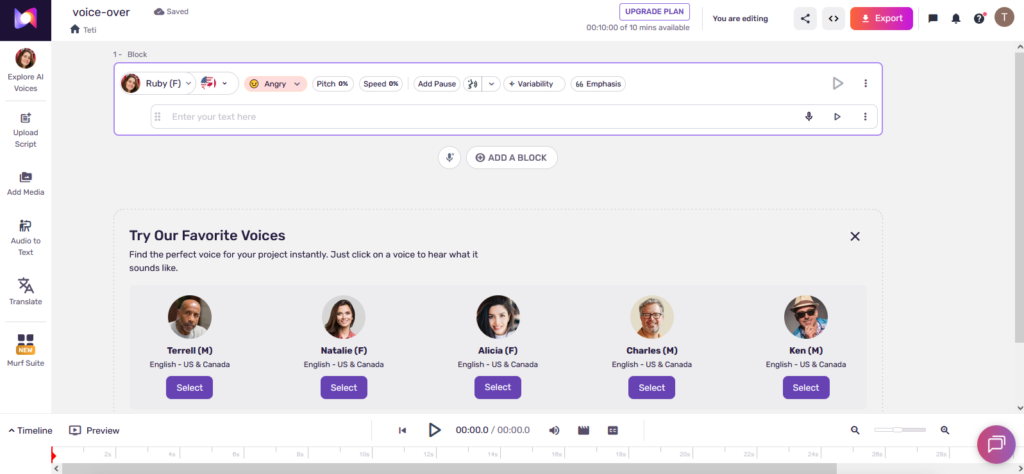
Once the project loads, the Murf AI workspace opens in front of you. The interface is divided into several key functional areas:
- Text Block: In the center of the screen is the purple text field labeled “Enter your text here.” Here you should type (or paste) the sentences from your script. You can split the text into smaller paragraphs by clicking the “+ ADD A BLOCK” button below.
- Quick Voice Settings Bar (above the text field):
- AI Avatar Selection: Click the name and photo of the current voice (in the screenshot this is Ruby (F)) to open the full catalog and choose a language and accent (e.g., Bulgarian, English, etc.).
- Tone: The dropdown menu (currently set to Angry) lets you change the speaking emotion (professional, excited, calm, and so on).
- Pitch & Speed: You can adjust the pitch of the voice and the speaking speed.
- Add Pause: A button for artificially inserting seconds of silence between words for more natural-sounding speech.
- Try Our Favorite Voices: At the bottom of the screen, Murf AI shows you a quick panel with some of its most popular voices (such as Terrell, Natalie, and Alicia). You can click their avatars to hear them and select one quickly using the purple “Select” button.
- Toolbar (on the left): From here you can upload ready-made scripts, add background music or video files, and even translate text.
Step 3: Browsing the Catalog and Filtering Voices
When you click on the voice avatar in the workspace, Murf AI’s extensive voice library opens. The interface gives you powerful control for finding the perfect narrator through the following areas:
- Purpose Filters (top): You can quickly filter voices by the type of content you’re creating — E-Learning & Presentations, Audiobooks, YouTube, Podcasts/Blogs, Documentary, and more.
- Basic Filters (below the categories):
- Language Selection: From the flag dropdown menu (in the screenshot, English – US & Canada is selected) you can choose the language you want the AI to speak.
- Genders / Age Groups / Styles: Additional filters for gender (male/female), age (children, young, adult), and speaking style (e.g., corporate, dramatic).
- Test Your Own Text (Listen to your custom text): In the long white field you can type your own sentence and hear exactly how it will sound with different voices before choosing one.
- AI Avatar List and Detailed Preview (right side):
- Each voice (such as Natalie, Ken, Amara) displays available emoji indicators and tags like Gen 2 (a newer, more realistic voice generation).
- In the right-hand panel you can see the full profile of the selected narrator (in the screenshot, Natalie). From here you can listen to short samples in different styles (such as Promo or Narration) using the Play button.
- Once you’ve found your voice, check the “Apply to project” box at the bottom right and click the purple “Use Voice” button.
Step 4: Generating the Audio and Fine-Tuning
Once you’ve chosen a voice and entered your text, it’s time to turn the words into real speech.
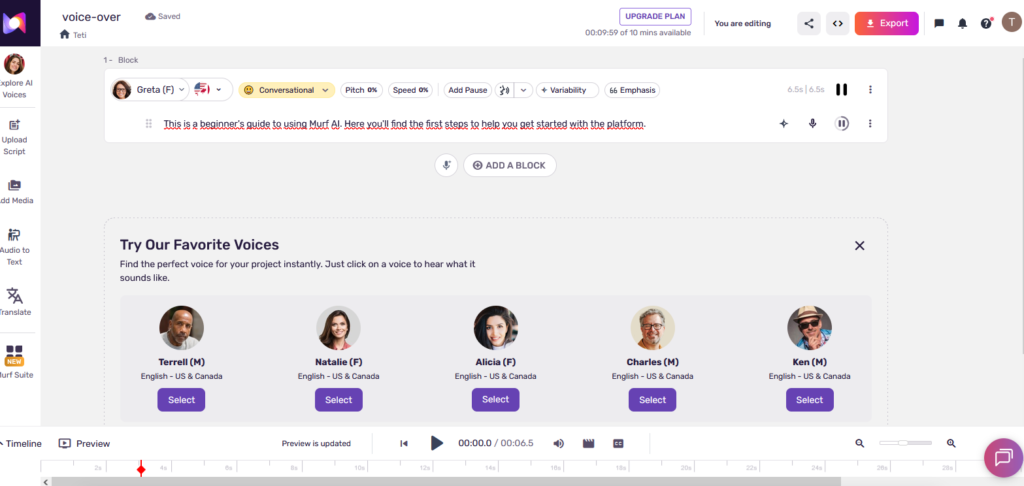
- Generate (Render):
- Click the round generate button (the “Play” icon at the right end of the text block). The AI will process the text within seconds.
- Once it’s done, the button turns into a classic pause icon (||), and to its right you’ll see the exact duration of the generated segment (in this case, 6.5s).
- Working with the Timeline (at the bottom):
- A timeline appears at the bottom of the screen. The red marker shows how far along the audio has progressed.
- The large “Play” button in the center of the bottom bar lets you listen to the entire project from start to finish, so you can judge whether you like the intonation.
Step 5: Exporting and Downloading the Finished Recording
Once you’re completely happy with the voice, pace, and pauses, it’s time to download the file so you can use it in your videos or presentations.
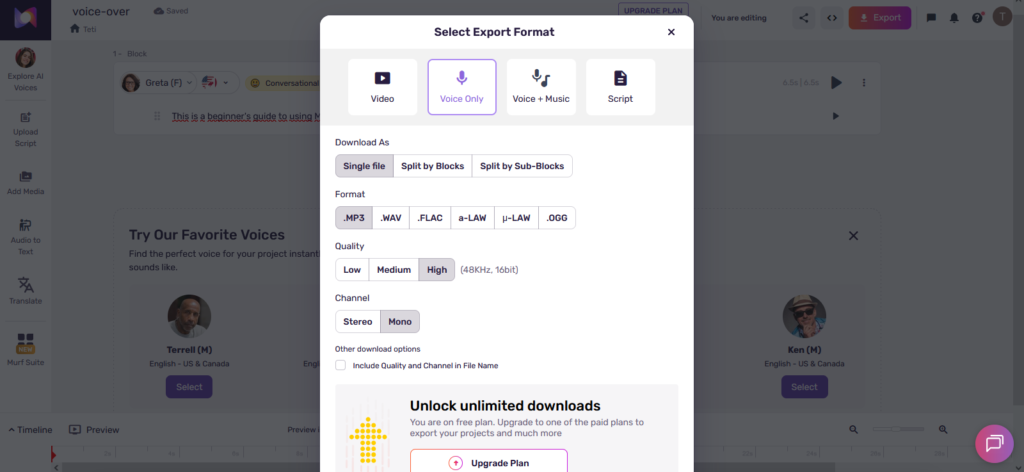
- Go to the upper right corner of the screen and click the large red “Export” button.
- A window will open with format options. For a clean voice recording, choose Audio (.mp3 or .wav).
- You can choose the audio quality (High is recommended for professional purposes) and whether to download the audio as a single file or split into blocks.
- Click “Download” and the file will be saved to your computer.
And that’s it — your audio is ready! The process takes just a few minutes, and the result is a natural-sounding voice that saves you hours in a recording studio.